Build a confidence-gated auto-reply agent for Zendesk
Copy page
Reply publicly to the customer when the knowledge base is sure of the answer — and stay quiet when it isn't.
Overview
In this tutorial, you'll build an Autoreply agent in the Inkeep Visual Builder. When a new ticket lands in Zendesk, the agent will:
- Read the customer's question
- Ask a confidence-aware KB tool — it returns an
answer, aconfidencelevel, andcitations - Always post an internal audit note with the answer + confidence
- Only when confidence is
very_confident, also post a public reply to the customer
The contract is: high confidence → customer gets replied to; anything less → a human takes over. You get deflection on the easy stuff and human review on the hard stuff, automatically.
Prerequisites
- Access to Inkeep Enterprise — schedule a demo if you don't have it yet
- A Zendesk org where the agent can post both internal and public comments
- A Zendesk MCP server registered in your project, with tools that post internal comments and public comments. If you don't have one yet, see Build Custom MCP Servers.
Expose the Inkeep QA confidence tool
Inkeep's QA API answers a question against your knowledge base, and it can call custom tools you define as part of answering. You'll use that capability to grade each answer with a confidence level and return it alongside the answer and its citations. That confidence level is what makes safe auto-reply possible — it's how the agent knows whether the KB is sure enough about the answer to send it to a customer.
The five confidence levels:
| Level | Meaning |
|---|---|
very_confident | The KB has a direct answer. Safe to send publicly. |
somewhat_confident | Partial match. Don't auto-reply — human handles. |
not_confident | KB has tangential info at best. Don't auto-reply. |
no_sources | KB has nothing relevant. Don't auto-reply. |
other | Anything else (off-topic, too vague, etc.). Don't auto-reply. |
To make this available to your agent, expose it as a tool called ask_with_confidence(question) → { answer, confidence, citations }. The cleanest way is a thin Custom MCP that wraps the Inkeep QA API — see Build Custom MCP Servers for the Next.js template and the inkeep add --mcp CLI flow. Deploy it and grab the public URL.
confidence isn't a built-in field — you define it. Inkeep's QA API supports custom tool calls: you register a tool the answering model invokes to grade how well the KB covers the question, and your MCP surfaces that grade as confidence. The five levels above are the example taxonomy this tutorial uses — adjust them to fit your bar for sending a public reply.
Once it's deployed, register it as a Custom Server MCP in the Visual Builder:
Click MCP Servers in the left sidebar, then New MCP Server → Custom Server.
Fill in:
- Name:
Inkeep QA (with confidence) - URL: the public URL of your deployed Confidence MCP
- Credential: select your Inkeep API key credential (same one your Unified Search MCP uses — see Customer Assistant setup if you haven't created it yet)
Click Create.
Create the Autoreply agent
In the Visual Builder, go to the Agents tab in the left sidebar and click Create agent.
Click the Default Sub Agent on the canvas to configure it. Fill in:
- Name:
Autoreply Decider - Description:
Always posts an internal audit note. Posts a public reply only when KB confidence is very_confident. - Prompt: Paste the prompt below
Prompt:
Tool names to verify before you save:
ask_with_confidenceis the example name for the Confidence MCP's tool. If you renamed it during deployment, swap it in the prompt to match.add_internal_ticket_commentandadd_public_ticket_commentare the example names for the Zendesk comment tools. Swap if your MCP names them differently.
Connect the MCPs
On the agent canvas, drag and drop an MCP block from the top left toolbar. Select Inkeep QA (with confidence) and connect it to the Autoreply Decider sub agent.
Click the MCP block and restrict Active Tools to only ask_with_confidence (it's likely the only tool exposed anyway).
Drag a second MCP block onto the canvas. Select your Zendesk MCP and connect it to the Autoreply Decider sub agent.
Click the Zendesk MCP block and restrict Active Tools to only the two tools this agent uses: the internal-comment tool and the public-comment tool. Leave everything else off.
Click Save Changes in the top right corner.
Create the webhook trigger
The trigger is the door Zendesk knocks on to wake the agent up.
Go to Triggers in the left sidebar and click New Webhook Trigger.
Select the Autoreply Decider agent you just built as the agent this trigger will invoke, then click Continue.
Fill in:
- Name: e.g.
Zendesk new-ticket trigger (autoreply) - Authentication:
None— the URL itself is the secret
Click Create Trigger. Copy the webhook URL that appears — you'll need it in the next section.
Wire Zendesk to fire the trigger
Now set up Zendesk so every new ticket POSTs to the trigger URL you just copied.
See Trigger Inkeep agents from Zendesk tickets — paste your trigger URL into the Zendesk webhook's Endpoint URL. Come back here when you're done.
Test the agent
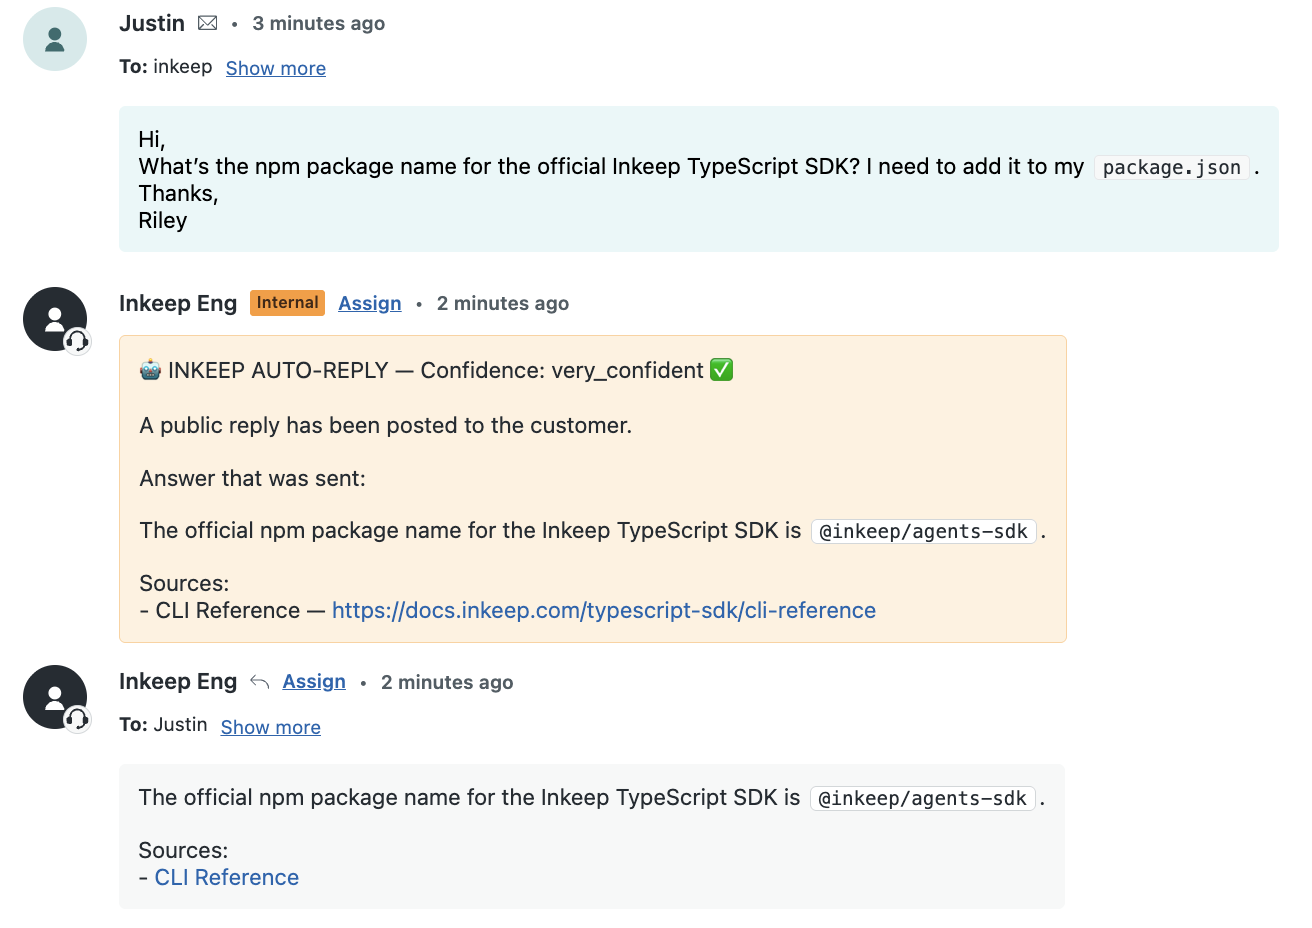
Send a test ticket your KB should be confident about — pick a common FAQ your docs cover (e.g., "How do I get started with [your product]?"). Within ~15 seconds, both a public reply and an internal audit note should appear on the ticket.
Send a second test ticket your KB shouldn't be confident about (e.g., "What's the best wifi router for my apartment?"). Within ~15 seconds, only an internal audit note should appear — marked Auto-reply blocked. The customer sees nothing. That's the gate doing its job.
Internal-note draft
Draft a KB-grounded reply as a private comment on every new Zendesk ticket — the human rep reviews and sends.
Overview
Turn resolved support tickets and product changes into drafted documentation — a developer-docs PR or a customer Help Center article — with a human approving every change.